Sunday, September 5, 2010

Photo Retouching: New Personal Work

Hi all,
I wanted to show everyone some of my new personal work and retouching that I have done recently. I had some extra time to work on my own stuff and wanted to open it up to all of you to see if you have any comments or constructive criticism for me!

Heres the link. What do you think?!

:::Note::: The link was strangely redirecting to my website landing page. It now is fixed to go to the new retouching online gallery!


Please post your comments by clicking the link below. If you've got questions, please pose them in our Retouchers and Retouching Discussion Threads.

READ MORE (Full Post and Comments)

Sunday, August 22, 2010

Photo Retouching: New technique.

Hi Guys,
I have recently been focusing on the texture of skin in my images and have been thinking about all the skin smoothing techniques I know to make skin look flawless AND realistic at the same time. So I have added one step to the Katrin Eismann technique in the video in the post below, and I think it really helps to create a more natural skin texture!


Click on the image to see a larger animated gif!
(I took the picture too, fyi!!)

In the video in the post below you learn how to use the channels to make a selective color layer and blur it using surface blur. I have this made into an action in my photoshop actions. What I have been doing recently before running that action is pressing {shift + option + command + E} this is the keyboard shortcut for Merge Visible and making a new layer that contains all the changes I have done thus far to the image.

Then you go to Filter -> Other -> High Pass.
Once you are in the High Pass screen, drag the image zoomed into 100% in the box to a part of the image that has skin in it. So you can see the pores.
Slide the radius slider until you can see the pores very well. Then press ok.

With that layer now selected, press {command + U} to unsaturate the layer completely.
Next you will change the blending mode of that layer from "Normal" to "Soft Light."

You will need to turn off the visibility of the layer you just made by pressing the eye next to the layer so that it is invisible. Then drag the layer below a visible layer.

Then, press {shift + option + command + E} again to make another regular layer without the high pass. With that layer selected, do the Katrin Eismann skin smoothing technique shown in the post below.

Once you have completed that, bring the high pass layer back to the top of the layer pallet and mask in the skin detail on top of the layer where the shin was smoothed. It will bring back the detail in the skin and it will look like your model has flawless skin!

Before:

After:

Obviously, there are a few more things that I did to this image to make it really pop but most of it was clone tool and stamp tool stuff, and I didn't want to make this post too long.


Please post your comments by clicking the link below. If you've got questions, please pose them in our Retouchers and Retouching Discussion Threads.

READ MORE (Full Post and Comments)

Saturday, August 21, 2010

Photo Retouching: Skin Smoothing

I went to Photo Plus last year in October and while I was there, I sat in on Katrin Eismann's retouching tutorial. I saw the technique that she learned from Chris Tarantino. It is shown in this video link below.

The technique shows you how to select just the skin and soften the shin without loosing detail.

Skin Retouching Video
***It takes a minute to load... but I promise it's worth the wait!***


One thing that I did not include in this video was using the High Pass filter to add even more detail to the skin.
The way you can do that is once you finish the video tutorial, you will hide the skin layer you just made and select the layer underneath it (your layer that is the equivalent to my "Skin Retouch" layer).
You need to duplicate that layer, then you will go to Filter > Other > High Pass.
Use a radius of about 8 or 9.
Select the High Pass layer, and then Command+U to take the saturation of that layer down to zero.
Change the blending mode to Overlay.
Move the layer with the detail to the top of the layer pallet.


Please post your comments by clicking the link below. If you've got questions, please pose them in our Retouchers and Retouching Discussion Threads.

READ MORE (Full Post and Comments)

Thursday, June 24, 2010

Yes, I AM alive!

Hi everyone, first off I owe all of you an apology for how long its taken me to post here. You all have permission to wag your finger at me repeatedly!

I wanted to show you some of my new work that I have been doing. I did both photography and retouching on these images and personally I think they are work showing off a little!

This was my first time working with a new make-up artist; Lisa Carter-McPhee. I was extremely pleased with the outcome and I think her work is really well done.


Please post your comments by clicking the link below. If you've got questions, please pose them in our Retouchers and Retouching Discussion Threads.


I have attached a link to the animated gif to show you the retouching i did! If anyone has any questions on how to do something, all you have to do is ask and I'll tell you how to do it. (I opted to post a link here instead of embedding the image to keep it large so you could really see the detail as the gif changes.) Photo Retouching Animated Gif Link


READ MORE (Full Post and Comments)

Thursday, July 23, 2009

Photo Retouching: Under eye curves


Have you ever come across a situation with under eye circles and try to tried to use the healing brush and the clone stamp to cover them up but then get frustrated with the textures don't match? Well that has happened to me plenty!! I watched a tutorial by Chris Tarantino about a month ago when I was down at LOOK3 in Charlottesville Virginia that made an interesting point. Its not so much the texture of the skin that needs to change, but more the pigmentation and color.

In doing my own research to try and combat under eye circles (much of which are caused my stress and over working :); I have found out a little bit of background information that may come in handy when thinking about ways to rectify them in photos. The skin under your eyes is much thinner than the rest of your skin on your face, thus is more transparent. Un-oxygenated blood settles under your eyes and can be seen through the thin skin that lies underneath your eyes. This is what causes dark circles. (Disclaimer: I am a photographer, not a doctor).
Heres a way to retouch out dark circles without touching the texture of the skin at all. And as far as I am concerned, the best way to tackle under eye circles.

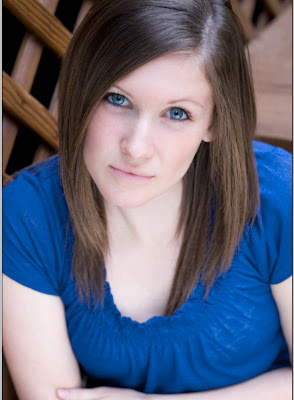
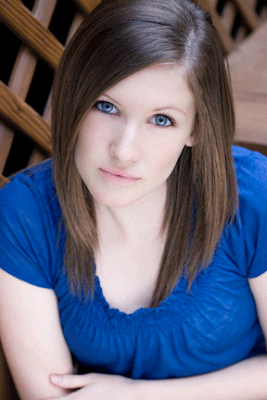
Here is the unretouched image in its original state. As you can see, she's already a gorgeous girl that doesn't need much retouching at all. This is just to show the example.

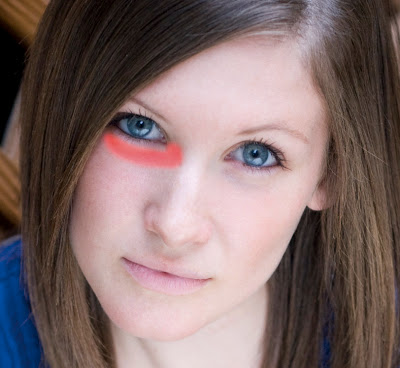
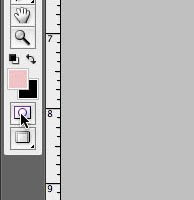
I started by clicking the quick mask button on the lower left part of your tool bar. 
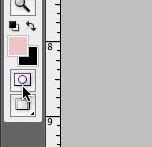
Then with a soft edged paint brush, draw in the area that you want the effect to be applied to. Make it look like your subject has a black eye (but in this case, it's bright red).


Then hit the Q key to exit out of quick mask mode and second, hit Shift+Command+I to select inverse. You should now have marching ants around the area you want to focus on.
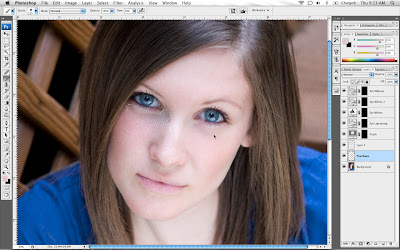
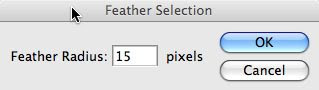
With your selection still present, go to Select-Modify-Feather to feather the area by 15 pixels. Then REPEAT.
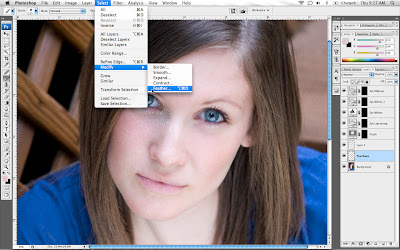
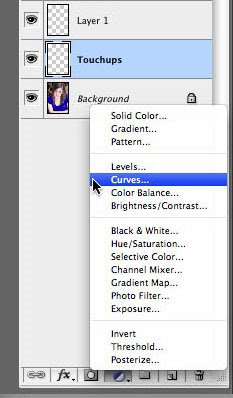
After you have feathered your selection, you can Command+H to hide the marching ants. Now go to your adjustment layers icon and click on a curves adjustment layer.

On the RGB Channel, take your midtones up until they match the surrounding skin brightness. Make sure you have the Preview button checked so you can see the changes in the image as you play around with the curve.
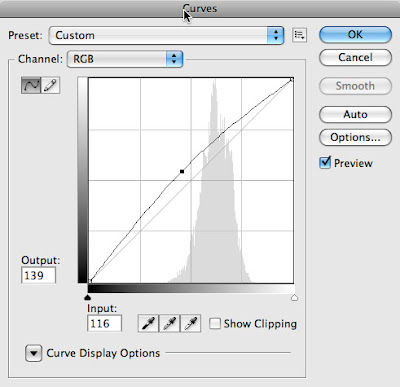
Then change your channel to the Red channel and increase the midtones there as well. This will increase the saturation of the red times in that area to combat the blue that is there to begin with.
Heres what the left eye looks like after the changes.
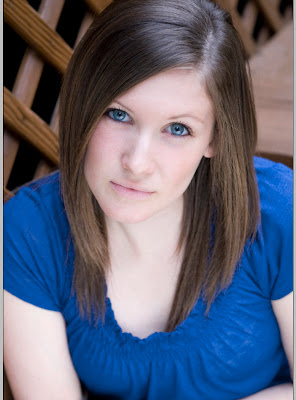
Then I repeated the whole thing on the other eye. Clicking on the quick mask button.

Then drawing in the area that I wanted to changes to be applied to by using a feathered brush to color in under her other eye.
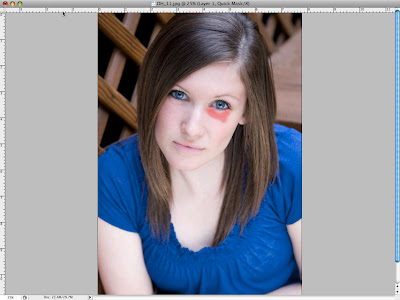
Then hit the Q key again to exit out of quick mask mode and second, hit Shift+Command+I to select inverse. You again see marching ants around the area you want to focus on.
Then repeat the feathering of the selection by going to Select-Modify-Feather to feather the area by 15 pixels...again. Then REPEAT.... again.

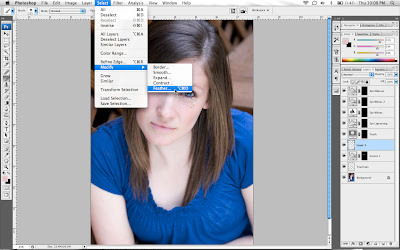
Once you have feathered your selection, you can create another curves adjustment layer.


Make the same changes to the right eye as we did to the left on both the RGB channel and the Red channel. The reason you do the two eyes differently is because 9 times out of 10, one single adjustment won't work for both eyes.

Here is the finnished product! Good job guys!!


Please post your comments by clicking the link below. If you've got questions, please pose them in our Retouchers and Retouching Discussion Threads.

READ MORE (Full Post and Comments)

Friday, May 15, 2009

Photo Retouching: Thinking outside the box...I mean frame!


Have you ever almost had that perfect shot from a vacation or shoot where one of the most important parts of the picture is out of the frame? One of the things I have learned through my retouching is to think outside the box...I mean frame! Just because your canvas ends doesn't mean your photo has to! Ill show you how!

LEARN HOW By Clicking READ MORE...

On my trip to South Africa, we went to a game park and I had no idea how close the animals would get to us so while I was prepared with my 70-200mm and a doubler (2x), I was caught at a disadvantage when the animals got close to me without enough time to take off the doubler. This was the photo that I was left with.

Step One: Increase the canvas size. You are going to want to go into Image>Canvas Size and open up your canvas to be larger than the original image because you will be adding things to it.

When you get into the Canvas Size window, you will see a nine by nine square with arrows in it. This tells you where the image will sit on the canvas when the extra canvas is added. Since I want to add more canvas to the left side of my image, I have chosen to change the gray square one over to the right by clicking on it.


Step Two: Start rebuilding the part of the image that is most important. In my case, the part that is most important is the giraffe's mouth. Since I have another giraffe in the same photo that is not cut off, I have selected those pixels to copy and paste over to the giraffe that is cut off.

Select the mouth with the marquee tool, and press (cnt/cmd) C to copy and (cnt/cmd) V to paste. Don't be alarmed if you don't see the paste effects. The selection has been pasted directly over the original pixels so you may not see them at all. Then press (cnt/cmd) T to transform and (cnt/cmd) H to hide the lines (it will be easier for you to line up the edges if you can't see those white lines. Use the arrow keys to move the copied selection into place. Once it's in it's place you can press the enter key to accept the transform or the check mark at the top of your toolbar.

Once again that is: (cnt/cmd) C, (cnt/cmd) V, (cnt/cmd) T, (cnt/cmd) H.


Step Three: I saw that there was a small color change between the first giraffe and the second, and I needed to fix that. Press (cnt/cmd) L to bring up your levels pallet
and take down the midtones a tad.


Step Four: Start building the other areas of the image. The more prominent the features are in your background, the harder this part will be for you. The biggest suggestion I can make for you is not to grab pixels from the same area and use them to fill in the black area. You will end up with the "bad clone stamp effect" as I like to call it.

Peoples' eyes and brains are constantly looking for patterns in images thats why they are so easy to spot on a bad photoshop job.

This bush was important because it is a large part of the picture. So I knew I needed to continue it on in my black space. I copied it and pasted it like I did in step 2, but this time since it is going to be the opposite side of the bush, I needed to flip this piece of the image vertically so it would look like the other side of the bush.

Press (cnt/cmd) T to transform your selection and while holding down shift, drag the box/line on the right side of the box all the way past the left line and over further. Now you have flipped the selection. Press enter to accept the changes.

Do this a few more times from different parts of the image so you don't create any patterns.
Move the selections into place using the arrow keys or your pen/mouse.

This is what your image should look like after you have filled in the space on the left of the photo with different areas of bush from around the photo.

Here is a close up image:

The next step is to use the clone stamp and healing brush to get rid of those lines in your image.

Here is your final image! Congratulations!


Please post your comments by clicking the link below. If you've got questions, please pose them in our Retouchers and Retouching Discussion Threads.

READ MORE (Full Post and Comments)

Saturday, March 7, 2009

Photo Retouching: Retoucher to ReTeacher

I am pleased to announce that I am going to start teaching retouching seminars at Washington School of Photography! I'm really excited to be passing on my talents to other people that are eager to learn.
If you are in the area, please feel free to come in and take a seminar.


Please post your comments by clicking the link below. If you've got questions, please pose them in our Retouchers and Retouching Discussion Threads.

READ MORE (Full Post and Comments)