Tuesday, December 16, 2008

Photo Retouching: The Tan without the Cancer


When it comes to winter in Washington, theres a bunch of places you'd rather be. Like somewhere tropical or warm. One way to ease those winter blues is to give your subjects that sun-kissed look without tanning beds or smelly sprays.
Read after the jump to learn how.

READ MORE (Full Post and Comments)


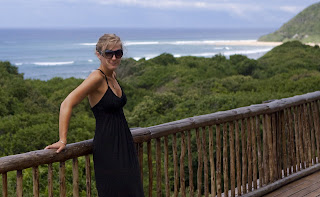
And here is the rest of it.We start off with a photo of a girl that is not quite as tan as she would like, so we will take the necessary steps to change that for her.
Step One: Create a blank later and fill it with a brown color that is derived from the skin tine of the girl.

Here you will need to change what you fill the layer with so it says color.
It will prompt you to pick a color wit h the color picker. My preference is to start with a color on your model already and then pick a color slightly warmer and slightly darker than what you sampled from the model.The circle is the color that I sampled from the model and the arrow is the color I chose to use as the fill color for the layer.

Step Two: Change your blend mode to overlay.
Step Three: Add a layer mask by OPTION clicking on the button below. This will give you a mask that is completely black so nothing will be showing.
Click on the mask itself and paint with your brush tool with the color white over the area you would like to be affected by the color. Once you have completed your mask and it looks like everything is painted in, you can option click on the mask on your layer menu and you can see your mask. I painted at 30%-40% opacity with my brush so you can see some of the brush strokes that were left. To blur some of the brush strokes on the image, I wanted to add a gaussian blur to the mask.

Here are my adjustments in the gaussian blur window.
Here is where I am as of now and she is still a bit too orange. So I need to tone down the color and change the hue a bit.

Make a Hue/Saturation adjustment layer.

Select the reds from the drop down menu and add these adjustments to the Hue/Saturation Layer.

Your Hue/Saturation layer will be affecting the whole image at this point to to make it only affect the skin you are going to click on the mask on the layer below it and hold down option while you drag it to the Hue/Saturation layer.

You will be asked if you want to replace the mask, click yes. Here is the final tanned image. Good job everyone!!! If you have any questions feel free to email me at Kristina@KristinaSherk.com


Please post your comments by clicking the link below. If you've got questions, please pose them in our Retouchers and Retouching Discussion Threads.

READ MORE (Full Post and Comments)

Monday, December 1, 2008

Photo Retouching: A Retouchers Dream

While I was up at Photo Plus Expo in NYC, I took a seminar with Chris Alvanas in which he showed me one of the most useful tools.
Eyelash and Eyeshadow brushes from DeviantArt.com, they have lots of different brushes like this one if you simply search for "eyelash brushed" on the search bar.

How to download located after the break.

Click "download" from the website and it will save the file onto your desktop. You will need to unzip the file (some computers have software for this already installed, but if you don't, you can always control-click (right click) and press "uncompress" from your options.

The next step is to find where the brushed are located already on your computer. You can locate them by clicking on the mac magnifying glass and entering ".abr" into the field.
Jump down to the second or third listing, click on it, and it should show you the path on where that brush lives. Mine says "Macintosh HD > Applications > Adobe Photoshop CS4 > Presets > Brushes" Control-click (right click) and press Open Enclosing Folder which should tale you right to the folder where they reside.

Drag and drop the brush set from your desktop into that folder. Restart Photoshop and they should be in your brush palette.

If you are working on a PC you can watch this video on youtube.


Please post your comments by clicking the link below. If you've got questions, please pose them in our Retouchers and Retouching Discussion Threads.

READ MORE (Full Post and Comments)

Sunday, November 2, 2008

Photo Retouching: Irresistible Eyes

There are so many eye enhancing tutorials out there I just thought that I would add one that I learned from Chris Alvanas at Photo Plus Expo last weekend.
Learn How by Clicking on READ MORE

Step One: Select the Iris. You are going to do this through the Quick Mask Tool. Click the button that is being pointed to in the jepg below (or you can press the Q key) to enter into Quick Mask Mode.
Next you will want to select your brush tool, (make sure your color swatches are set to black and white) and start painting. You should be seeing a red film over the area that you are painting.
It is my personal preference not to include the pupil and reflections in the selection because changing the color in those areas will make the eye color look less real.
Now that you have your selection, you need to take a few steps to actually select the area that you want to change. First, you need to press the Q key to exit Quick Mask Mode, then you need to go to the Select Menu and press Inverse.

Now your selection should look like this.

Step Two: Change the color. From your adjustment layer drop down menu, select a Color Balance layer.

Here are the eyes with the color adjustment made.

Step Three: Add contrast and dimension to the eyes. You are going to make two curves adjustment layers.

One where you are going to lighten the midtones (name this later lighten) and another where you are going to darken the midtones (name this layer darken).

Then you are going to option click the mask button on both of the curves adjustment layers on your layer pallet. This will hide both curves adjustment layers so you will not be able to see them. This is what your layers should look like.

With your lighten curves layer selected, paint with white on the mask in the inner part of the iris to reveal the lighter color. This is what your mask should look like.

Now with your darken curves layer selected, paint with white on the mask in the outer part of the iris to reveal the darker color. This is what your mask should look like.

The darken layer on my eyes was a little harsh so I threw a Gaussian Blur on it at about a 3 or 4.
Now I am going to decrease the opacity to around 60%.

Here is the finished image! Congratulations!


Please post your comments by clicking the link below. If you've got questions, please pose them in our Retouchers and Retouching Discussion Threads.

READ MORE (Full Post and Comments)

Tuesday, October 28, 2008

Photo Retouching: Recent Work

I thought I might show this to you. It's an image that I recently retouched for a client. When they first called and asked me to put a t-shirt on the boy where there wasn't one before, I didn't think I could do it, but I told her I would try and through a lot of trying out different methods, I got it to work! It's not my finest work, but it's not bad for the time I had to do it in (same day turnaround).

So sorry, but for this image there are way too many steps to make a tutorial, but as I teach you more and more techniques, you should be able to guess-timate the tools that I used! Good luck!


Please post your comments by clicking the link below. If you've got questions, please pose them in our Retouchers and Retouching Discussion Threads.

READ MORE (Full Post and Comments)

Monday, October 20, 2008

Photo Retouching: Backgrounds 101

Sometimes, I am tasked with retouching things other than the actual model in the photo. Here, I had to take away the distracting lines behind this hair model. They were taking away too much from the image, as well as add a piece of hair to perfect the hair style!

Click after the jump to see how I did it!


Step One: Use the clone stamp tool to erase the lines off of the image. Because of small shadow differences in the colors, you'll want to choose a reference point that is as close to the part that you are painting over as possible. Use different size brushes and different opacities to make it look more realistic.
Your image should look like this when you have gotten rid of the lines.

Step Two: Select piece of hair. What I did here
was to go into Quick Mask Mode (by pressing Q on your keyboard)to select a tress of hair that I could copy and paste into the area where the client wanted filled.

Hit the B button on your keyboard to select your brush tool and paint at 65% opacity.

NOTE: When you are in Quick Mask Mode, your layers will be highlighted in gray, not blue.

When you are done painting in your QM Mode, you can then hit Q again to exit Quick Mask Mode, and go to Select>Inverse to inverse your selection so that the piece of hair is selected.

Step Three: Place hair piece. While you have the piece of hair selected, press Cont/Comd C to copy the selection, and then Cont/Comd V to paste it.
You can then press Cont/Comd T to transform the selection and move it into place. If you work better with the lines hidden, you can press Cont/Comd H to hide the lines. Use your arrow keys to move and adjust the placement of the piece of hair.

Here is the final image again. Congratulations!


Please post your comments by clicking the link below. If you've got questions, please pose them in our Retouchers and Retouching Discussion Threads.

READ MORE (Full Post and Comments)

Thursday, October 16, 2008

Photo Retouching: Retouching Video

Heres a clip that will make you chuckle, in the same vein as my last post about the well known star who looks strikingly like a vice-presidential hopeful, I thought I would share this with you.


Thanks to Colbert Report


Please post your comments by clicking the link below. If you've got questions, please pose them in our Retouchers and Retouching Discussion Threads.

READ MORE (Full Post and Comments)

Tuesday, October 14, 2008

Photo Retouching: Snap-shot to Portrait: Some Easy Steps

There are some fundamental differences between a snap-shot and a portrait: positioning, eye-contact and most importantly, lighting. We all know that it takes a lot more time to make a portrait than it does a snap-shot, but what happens when you want a portrait, but only have time to make a snap-shot? It's all about the eyes. By simply changing the positioning of the catch light in the eyes, you can create the illusion of off-camera lighting, with only the flash of your camera.

In this post I will concentrate on the changes you can make to the eyes of a person that suggest off camera lighting when the only lighting was actually a flash mounted on camera.
Step One: Brighten the whites:
This allows for the illusion of more light hitting the eyes. You will need to hit your Q key to enter into quick mask mode. Then paint with the brush tool (the harder your edge, the harder/less feathered the edge of the selection - so use a soft brush). Once you have colored in the eyes red, you will want to hit the Q key again, which will take you out of quick mask mode. Then you will need to invert the selection so you have the eye whites selected (do so using Select>Inverse). Once selected, you can use the mid times slider in the levels or curves window to lighten the whites.
Step Two: Brighten the eye color:
Select the bottom part of the iris with a half moon shape (see step one on how to select the area) and brighten the midtones using levels (Apple L) or curves (Apple M).
Note: If you would like to play around with the color/saturation of the eye color itself, use the Hue/Saturation (Apple U) window.Step Three: Remove the flash reflection:
Every photographer knows that when you take a photo of someone using a flash while they are looking at you, you are going to have a reflection of that flash in the persons eyes. That is a tell tale sign of on-camera flash, and you need to remove that evidence. Use the clone stamp to remove the larger of the two catch lights in the pupil of the eye. I like to use my clone stamp tool at 65% for this and make sure that you sample an area inside the pupil so the colors match.
Step Four: Make your own off-camera catch light:
I tend to use the paint brush tool for this next step. You want to sample the color of the small catch light that we left in the eye, and use that color (or a little lighter) for the larger catch light. Paint in your catch light into both eyes and make sure they match.
Step Five: Blur the catch light:
You will want to then blur the catch light a bit so that you can't tell it was painted into the photo. Blur using the blur tool on your tool pallet.

Here is the final close up of the eyes again: Great Job!


Please post your comments by clicking the link below. If you've got questions, please pose them in our Retouchers and Retouching Discussion Threads.

READ MORE (Full Post and Comments)